My Lock Down Food Experiments

When the recent pandemic lock down began, the oven on my stove died. This meant that I had a stove-top, but no way to bake food. No one was allowed to enter my apartment to fix it, either. That led me to find creative ways to make food. Those creative ways led to various experiments. Maybe some of my experiments will inspire you guys to play with your food!

STEAMED MEATLOAF
I’m sure it sounds as appetizing as it appeared, but it worked. I learned that steaming can be used as an alternative to baking when in a pinch. Things take longer, and the steam kills some of the flavor of meat. However, you can season meat before cooking with little concern.
The ideal steamed meatloaf (let’s be serious, there’s no such thing) is made with ground meat, an egg, breadcrumbs, a selection of vegetables, including both raw and caramelized onions, and mixed by hand. Placed in a loaf tin, the meaty mixture is then steamed in a large pot of water until properly cooked. To brown your loaf, you should remove the cooked loaf from it’s tin and seer all sides, and heavily salt.
I know, it sounds tasty (sarcasm). But more importantly, realizing that I could season meat in advance of steaming it; but still would have to heavily salt it after it was cooked, helped when I made steamed chicken, which is actually not bad.

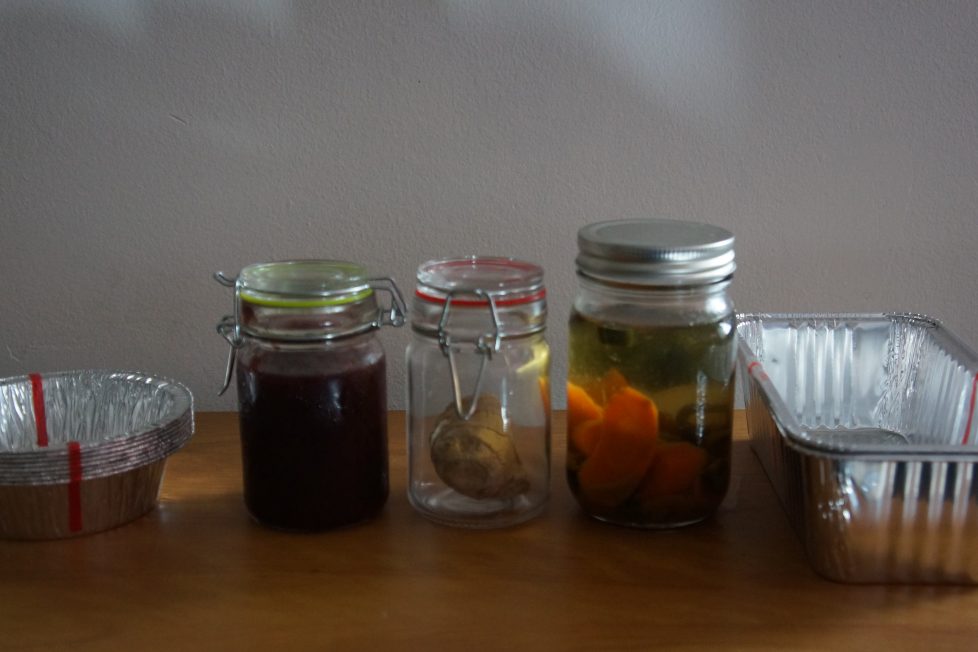
HOMEMADE JAM
Making jam is difficult. I tried making jam with pectin twice, and failed both times. However, there are some pectin free recipes that can make jam with more success. One wild berry recipe I found, is incredibly simple.
After blending all your berries, you measure the liquid and pulp. You then add the equivalent amount of sugar to the liquid. Have 5 cups of liquid and pulp? Simply add 5 cups of sugar and then cook the mixture. I slowly cooked mine at a high simmer for 50 minutes, poured it into jars and let it rest. The next day, the jam was not gelatinous, but I was pleased with how it spread on my bagels.

NO BAKE PIES
I’ve made 2 no bake pies so far. My favorite came after I went to the dollar store and bought a premade graham cracker pie crust. Because the crust was broken, I crushed it into cookie crumbs. I then added cookie crumbs from some Oreo cookies and added some warm cooking oil as a binding fat.
Adding the concoction to a greased pie pan, I pressed it down and evenly distributed the cookie crumbs. Instead of baking the crust, I put it in my freezer. The filling for the pie was quite simple. I whipped some coconut cream, adding sugar. When I finally filled the pie crust, before adding the whipped cream, I put a layer of homemade jam down. The top of the pie was covered with more Oreo cookie crumbs before the pie was placed back in the freezer to set.

PICKLING
I honestly don’t have much to say about pickling. It struck me as the natural next thing to try after making jam. Brine are easy to make. You can follow directions or experiment. What you’ll find are recipes that primarily feature vinegar, water, salt and sugar.
In theory, you can pickle anything. However, fresh vegetables worked best in my experiments. Pickling canned vegetables were hit and miss. I never got good enough at pickling to try and pickle an egg. To be honest, if your sole goal of pickling is to make your food last longer, you may consider canning your food in salt water. Pickling is as much about preserving food as it is infusing new flavors into it. Salt and water is easy to get right. But if you add the wrong herb, or additional seasoning to something you’re pickling, that could ruin jars and jars of food.

GINGER BEER
Ginger beer takes a lot of time and commitment to make. Without being stuck at home I would never have attempted it. First, you make what’s called a ginger bug. The bug is a concoction of water, ginger and cane sugar that creates yeast when you let it ferment. That’s what carbonates ginger beer. Ginger beer plant takes a few days to ferment. You’ll also need to add raw ginger and cane sugar to it everyday while it ferments.
When it’s ready, you add the bug to a ginger tea like liquid, which you’ve let cool to room temperature. Then, you have to pour the blend into a seal-able bottle. Once everyday, you will briefly open the bottle and then reseal it. That prevents the bottle from exploding. You do this for 3-10 days, until the ginger beer looks carbonated and is ready to drink. To slow carbonation at this point, your completed ginger beer should be refrigerated. I made 3 flavors of ginger beer:
1/ Lemon ginger beer
2/Cherry ginger beer
3/ Earl grey ginger beer
I did this by adding my seasonings to the bottles each ginger beer was stored in. Earl grey is definitely an acquired taste. But I can see an iced tea ginger beer working. Lemon ginger beer is pretty common, while cherry ginger beer was surprisingly delicious.
You have to use the full ginger, including the skin throughout this process. I recommend making ginger beer with ginger that is not stored in a fridge. Also, the recipe I used suggests using organic ginger. That makes a lot of sense. I suspect the mild after taste of mine was because I couldn’t find organic ginger.

SMOOTHIES
Finally, to make my jam making experiments easier, I bought an inexpensive hand-held blender. One day I wanted a smoothie, but was frustrated how expensive they are at my nearest supermarket. That, and I didn’t want to stand in a line for half-an-hour. Instead, I headed to a small vegetable market, spent way too much on fruits and vegetables and started making smoothies.
Let’s be honest, buying smoothies is a rip off. Once you understand how easy they are to make, you understand that you’ve been robbed for years.
What’s in a smoothie? Fruit and water. Want to make it fancy? Add some ice, or almond milk. Need texture? Make sure one of the fruits you picked is a banana. Don’t like ice? Store your fruits in your freezer. Don’t forget to add some sugar. All you need now, is a blender. You don’t even need to worry about pulp. That gives your smoothie more texture.
Honestly, a smoothie is a lazy person’s juice. Once you find a combo that suits your tastes and mouth feel, a smoothie takes seconds to make. You just need a blender or food processor. My favorite smoothie is wild berry and banana. Instead of paying for a tiny bottle that cost $6, I now use $2 of fruit to make three times the amount.
Now that smoothies have been debunked for me, do I dislike them? Of course not. We’re talking about smoothies here.